Rao’s is my wife’s favorite sauce, so this is the reason for the recipe choice. During this meal making my beloved birds (Eagles) were playing in the background AND they were actually winning. BUT – I remained meatball focused. In addition, the local radio station (99.5 WJBR) was playing “mis-mis” tunes because Christmas was 12 days away.
Like all previous recipes done here, simply click on the above title for the link of what was borrowed (adapted?). As always, I’ll lay out what we followed as well as any of the changes that were made along the way.
(The dinner’s beverage of choice – of course, it’s red)
The Line-up (Ingredients)
1 lb Ground Pork
2 eggs
1 cup of freshly grated parmesan
1 1/2 TBSP, Chopped Parsley
1/2 small garlic clove, peeled and minced
2 cups Breadcrumbs
2 cups Water
1 cup Olive Oil
Salt and pepper, to taste
1 garlic clove, lightly smashed
Game Plan (Instructions)
1) Combine ground beef, veal, and pork in a large bowl. Add eggs, cheese, parsley, minced garlic, and salt and pepper to taste. Using your hands, blend ingredients together.
(Yup – those are my hands – I dug into that meaty mess – gross)
2) Add the bread crumbs into meat mixture and combine. Slowly add water until the mixture is quite moist.
3) Shape the meat mixture into balls (2 1/2 to 3 inch balls)
(We made some good looking balls of meat)
4) Heat the oil in a large sauté pan and saute the smashed garlic clove until lightly brown to flavor the oil, and remove with a slotted spoon and discard
5) Fry the meatballs in batches
(First batch was 6 a little too many / smaller batches!)
6) When the bottom half of the meatball is very brown and slightly crisp, turn and cook the other half
9) Serve over pasta, within a hoagie roll, or all on their own.
(We threw the balls over some farfalle pasta and some extra sauce)
They were great! However, I still want to do something different with meatballs. I would like to make a softball size meatball at some point. Cut that open and it just oozes with goodness. I’ll work on that. In the meantime, this recipe certainly did the trick for homemade meatballs. Double win because the kids enjoyed them as well!
This was a Dave Chang inspiration. While I was listening to his podcast, he had brought up this soup and how he basically inhales it every time that it is made. In turn, I just had to try it. Being that it was the 6th of December, we had Christmas tunes on again.
Like all previous recipes done here, simply click on the above title for the link of what was borrowed (adapted?). As always, I’ll lay out what we followed as well as any of the changes that were made along the way.
The Line-up (Ingredients)
1 ounce dried gosari 고사리 (fernbrakes) – yields about 1 cup rehydrated
(not your everyday ingredient . . . only size available, too)
1 pound beef brisket, 양지머리 (or flank steak or shank meat) 1/2 onion do not cut the stem 8 ounces Korean radish (mu, 무) cut into big chunks – optional
(Uh, yeah . . . it’s big . . . and phallic – sorry)
(we only needed this much of it though . . . size doesn’t matter)
14 cups water (For richer soup, you can use milky beef bone broth to boil the beef.) 8 ounces bean sprouts (sukju, 숙주) 3 dry shiitake mushrooms soaked 2 – 3 bunches scallions 2 or 3 stalks of Korean daepa 2 tablespoons sesame oil 2 tablespoons gochugaru, 고추가루 (red chili pepper flakes) 1 tablespoon minced garlic 2 tablespoons guk ganjang, 국간장 (soup soy sauce) 1 teaspoon gochujang, 고추장 (red chili pepper paste) – optional 1 teaspoon doenjang, 된장 (soybean paste) – optional salt and pepper 2 eggs – optional lightly beaten 3 ounces dangmyeon (당면), starch noodles
(we found them – not easy!)
Game Plan (Instructions)
1) Add the gosari and 4 cups of water to a small pot. Boil over medium heat, covered, until tender. It might take about 30 minutes, but the time can vary significantly depending on gosari. Turn the heat off and let it cool in the cooking water. When ready to use, rinse in cold water and drain. Cut into 4-inch lengths, removing tough ends of the stems, if any.
(It’s a close-up of the cutting work done on the gosari)
2) In a large pot, bring the meat, onion, optional radish, and garlic to a boil in 14 cups of water. Reduce the heat to medium, and skim off the scum. Boil, covered, until the meat is tender enough for shredding, about 1 hour. Pull a string of meat off and check the tenderness. Let the meat cool a bit in the cooking liquid. Discard the vegetables, reserving the stock in the pot. Spoon off any visible fat. The broth should be about 7 to 8 cups.
(this really doesn’t look too pretty at this point)
3) When the meat is cool enough to handle, shred into about 3 to 4-inch strips.
4) Blanch the bean sprouts in boiling water for a minute. Wash with cold water and drain. Cut the scallions into 4-inch lengths. Thinly slice the soaked mushrooms.
5) In a pan, heat the sesame oil until hot over low heat and stir in the chili pepper flakes. Turn the heat off as soon as the oil starts to turn red and the chili pepper flakes become a bit pasty. This only takes a few seconds. Do not burn the flakes.
6) Add the meat, fernbrakes, mushrooms, 1 tbsp soup soy sauce, and garlic. Combine well.
7) Add the meat and gosari mixture along with 1 tablespoon of soup soy sauce into the broth. Stir in the optional gochujang and doenjang, and boil over medium high heat, covered, for 10 minutes.
8) Throw in the bean sprouts and scallions, and boil over medium heat for another 10 minutes. Add salt (1 teaspoon or more) and pepper to taste.
(Getting closer to wrapping up and readying this dinner soup!)
Within a few minutes before turning the heat, add the optional noodles. Slowly drizzle the optional eggs over the boiling soup and turn the heat off. Serve with rice.
(Bowls were topped off with “matchsticks” of Korean radish)
(Final shot of the soup – mmm, mmm, mmm, good)
It was good – really good. However, we did think of a couple other things to be done differently, if cooking up this soup again. First, we would want more mushrooms than what was listed in the recipe. Next, we would want to spice it up more, because the meat should have been more flavorful. Lastly, some lime should have been squeezed in to bring out more flavor. Nevertheless – all of the soup was inhaled, but not during one sitting. The very next day, I remember being at work on the road and simply draining my bowl (poured it back like a beverage). I thoroughly enjoyed every drop of the yukgaejang – say that 3x in a row.
Let’s just start with the meat being pricey. We both just got paid, so we were feeling really good about ourselves . . . maybe a little too good? Anyway, we got some really good meat.
(We can honestly say that this isn’t common)
There were 3 recipes (sorry), so, we definitely needed some beverage!
(Our respective beverages of choice)
It was also Christmas time so we just had the local station on playing non-stop holiday music – 99.5 WJBR. Ho, Ho, Ho! Just like with all the recipes done here, simply click on the above title for the link of what was borrowed (adapted?). As always, I’ll lay out what we followed as well as any of the changes that were made along the way.
The Line-up (Ingredients)
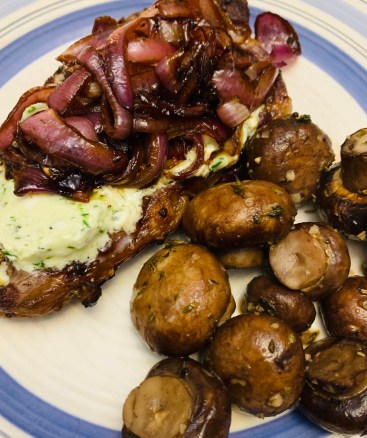
STEAK WITH BLUE CHEESE & CHIVE COMPOUND BUTTER
For the Steaks:
2 (1½ inch thick) steaks (New York strip, rib eye, flatiron or hanger steaks)
Course kosher salt
Freshly cracked pepper
Grapeseed or other neutral oil for grill (yeah, I didn’t do this)
For the Blue Cheese and Chive Compound Butter:
½ lb (8 oz) unsalted butter, (2 sticks) room temperature
2 teaspoons smooth Dijon mustard
3 tablespoons chives, fresh, chopped fine
⅛ teaspoon course sea salt
⅛ teaspoon freshly cracked black pepper
4 oz Blue Cheese
BALSAMIC ROATED RED ONIONS WITH THYME
3 large red onions (about 2 lbs / .9 kilos)
¼ cup plus 2 tablespoons balsamic vinegar (60 mL plus 30 mL)
¼ cup extra virgin olive oil (60 mL)
2 teaspoons fresh thyme (about 8 sprigs or ½ tsp dried)
STEAK WITH BLUE CHEESE & CHIVE COMPOUND BUTTER 1) Make the compound butter: Place the softened butter into the bowl of a stand mixer with the paddle attachment (if using a hand-held mixer, place butter into a mixing bowl) and beat until light and fluffy, 3-4 minutes. Add chives, mustard, salt and pepper. Beat on medium speed until everything is well mixed, 1-2 minutes.
2) Crumble in the blue cheese and gently mix until it’s incorporated. It shouldn’t be perfectly smooth, there should be a few small flecks of cheese here or there. Taste for seasoning and add salt and pepper if desired.
3) Place the butter in the center of a sheet of parchment paper, wax paper or plastic wrap. Form a log by rolling the bottom half of the paper over the butter (roll it back and forth a few times until it’s the thickness you want), then roll it all the way closed. Twist the ends to seal and tighten the log (you can tie them with twine if you like) and refrigerate until hardened, about two hours.
4) Note: This recipe makes about 12 servings of the butter. The sealed roll will keep for 4-5 days in the refrigerator or up to 3 months frozen.
5) Make the steaks: Prepare a charcoal or gas grill. If gas, preheat on high for at least 15 minutes ahead of time. Remove steaks from the refrigerator 30 minutes before cooking so they come to room temperature. Season them liberally with course salt and pepper on both sides.
6) Rub grill grates well with oil. Grill steaks until medium rare, about 3-4 minutes per side (or however you like them done).
7) Remove steaks and immediately top each with a slice of Blue Cheese butter. Let it melt for 5 -7 minutes as the steaks rest. Serve with Balsamic Roasted Red Onions with Thyme.
(Oooooooo – it’s done!)
BALSAMIC ROASTED RED ONIONS WITH THYME 1) Preheat the oven to 375ºF / 190ºC
2) Cut the onions in half vertically and then into ¼ inch thick slices (not paper thin or they’ll get mushy). Place on a baking sheet and toss with olive oil, thyme, salt, pepper and ¼ cup balsamic vinegar.
3) Bake on the middle rack for 30 minutes, turning once or twice, until the onions are soft and lightly caramelized. Remove from the oven, and while they’re still hot, pour over 2 more tablespoons balsamic vinegar. Toss to coat. Can be served warm or at room temperature.
SHEET PAN GARLIC BUTTER MUSHROOMS 1) Preheat the oven to 375ºF / Lightly oil a baking sheet or coat with nonstick spray.
2) In a small bowl, whisk together butter, garlic, lemon juice, thyme and rosemary; season with salt and pepper, to taste.
(cleaning the mushrooms – cool shot, too)
3) Place mushrooms in a single layer onto the prepared baking sheet. Stir in butter mixture and gently toss to combine.
4) Place into oven and bake for 12-15 minutes, or until browned and tender, tossing occasionally. Serve immediately.
(Steak close-up)
(Winner, winner, steak dinner!)
So, in conclusion, the meal was delicious. All of it. BUT – the price paid on that meat? Well, we don’t believe it had anything really to do with it. We’ll game plan a little wiser next time and yes . . . there will be a next time for this meal!
My beloved Philadelphia Eagles just lost on this day when I came up from our downstairs of an entertainment area. Always bleeding green, I was obviously miserable. In turn, my wife made an attempt at helping me from my bird driven madness. She asked me if I was interested in helping with the ribs for dinner. And just like that – Game on!
Now, she picked the music of Anderson East via Spotify for our meal making sound. She loves this guy. At a concert in Baltimore, here’s a picture of her meeting Mr. East:
(Me – holding the camera on this overexuberant shot)
Anyway, the man can truly sing and thankfully there was a really long line of other people that followed for pictures with him. Otherwise, I don’t know how I would have gotten her out of that place that night.
Just like with all the recipes done here, simply click on the above title for the link of what was borrowed (adapted?). As always, I’ll lay out what we followed as well as any of the changes that were made along the way.
The Line-up (Ingredients)
1 slab of pork baby back ribs (1.5 – 2.5lbs)
2 tbs brown sugar (light or dark)
1 tbs kosher salt
1 tsp ground black pepper
1 tsp onion powder
1 tsp paprika
½ teaspoon garlic powder
½ teaspoon ground mustard
¼ tsp cayenne pepper
½ cup chicken broth
½ cup apple cider vinegar
1 tbs Worcestershire sauce
1 tsp liquid smoke
BBQ sauce (about ⅓ cup of your favorite brand)
Game Plan (Instructions):
1. Remove membrane from the underside of the ribs by sliding a butter knife under the membrane and gently lifting it off. Use a paper towel for the best grip.
2. Mix all dry ingredients well.
(Before we mixed them up really well)
3. Then, rub the dry ingredients liberally on top and bottom of ribs. Get the sides too.
(Both top and bottom – rub it in good!)
4. Place trivet in Instant Pot and pour in the chicken broth, apple cider vinegar, Worcestershire sauce and liquid smoke.
5. Place ribs on their side on the trivet, curled around the inside of the Instant Pot with the top of the top facing outward. Secure lid, close vent, and pressure cook (manual on some models) for 28 minutes.
(Perfect curling of the slab of rib meat)
6. When cook time is complete, let pressure naturally release for 10 minutes, the go ahead and release the remaining pressure.
7. Remove lid and carefully remove the ribs with tongs. Place ribs on a baking sheet lined with aluminum foil.
(We soaked ’em with some spicy BBQ sauce)
8. Liberally rub your favorite BBQ sauce all over the ribs and place under the broiler of the oven for about 5 minutes, or until the sauce had nicely caramelized.
(Final shot with Celebration beer peeking in from the left – delicious!)
This was delicious and a clear cut winner for us. Another favorite part of mine was the leftovers – it wasn’t because it wasn’t enjoyed – we were just plain stuffed that night. In turn, I got to devour these meaty joys again later for an upcoming lunch – always a bonus. This is definitely a quicker and easier way to do some juicy, fall off the bone ribs in a much faster manner than cooking them up on the grill for hours.
Being a paperwork Monday, I was already home and it was one of those long, tedious days. Just when one fire is put out here, another one pops up over there. I simply wasn’t in the mood, but dinnertime didn’t care – it comes every evening whether you want it to or not. My wife is always the one that rallies the troops and gets the meal done for us, but not tonight because tonight was a Meal Challenge night, so I was all in. FYI – I do help on other nights – honest. It’s just that during the Meal Challenge dinners – I’m super helper! 🙂
The weekend prior I had made a run to the grocery store for us and initially couldn’t find the Arugula for this upcoming meal. However, we needed something else at some point for our Sunday night dinner and since I messed that one up too with missing something from the store, I ran out again in order to get this meal complete. This time, I found the arugula!
(Unfortunately, I bought the one pound container of Arugula, while all that was needed was simply a 1/2 cup. As you can see between the before and after shots, no real difference, once the required 1/2 cup was removed. We’ll be having a lot of Arugula salad this week . . . that’s a given.)
The Line-up (Ingredients)
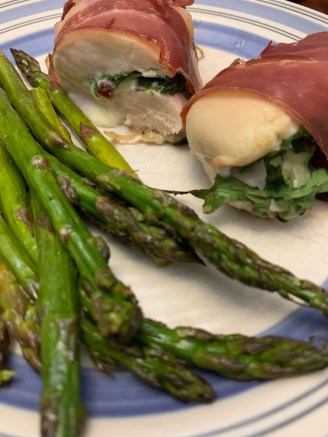
3 chicken breasts 3-6 pieces of prosciutto 1/2 pound brie cut into thin slices 1/2 cup dried cranberries 1/2 cup arugula
Game Plan (Instructions)
1) Preheat the oven to 400 degrees F.
2) Using a very sharp knife, cut a pocket in the middle of the side of each chicken breast from tip to tip. Cut just to the back of the breast, but not through the flesh. Make sure this is just a pocket, not cutting the breast in half.
3) Stuff a slice of brie, a handful of dried cranberries, and a third of the arugula into the pocket of each chicken breast. Wrap 1-2 slices of prosciutto around each chicken breast, “sealing” the prosciutto on the opposite side of the pocket.
(Step 1 with adding all the insides)
(Step 2 with wrapping it up snug & tight)
4) Add the stuffed, wrapped chicken to a large baking sheet with plenty of space in between each one. Place the baking sheet in the preheated oven and roast the chicken for 12-14 minutes.
5) Remove the chicken from the oven and let rest for 10 minutes. Serve with potatoes and salad and enjoy!
Okay . . . now a side-note. We really did not think that this was a enough time for the chicken to cook, so we went ahead and put the chicken in the oven for the full 14 minutes. We honestly felt good that the 14 minute mark should do the job. Unfortunately, we were quickly proven wrong once we cut our wrapped delights in half. Back into the oven they went for another 10 minutes! Afterwards, the bottom was dry and everything was a little crispy on the outside, but we still dug in and enjoyed what resulted. To help this dish next time, both extra cheese and cranberries would have been good changes to administer.
Final shot . . . see – even a couple cranberries spilling out would have made this a better looking meal, too.
We went from one of the easiest meals that we’ve done during this challenge (Ranch and Dill Pickle Pizza) to definitely the most time consuming one. But – it was so worth it! There were plenty of time gaps with this recipe. During a couple of those moments, my wife and I went outside to watch the kids as they biked and skateboarded the streets of our neighborhood. However, when back inside, the meal prep music of choice was suggested by my wife. Through Spotify, we “enjoyed” K-pop to go along with the food that we were making. I’m fine with it. I get it. I can hear the hooks. In the end though, I very much needed my Rock music.
Just like with all the recipes done here, simply click on the above title for the link of what was borrowed (adapted?). As always, I’ll lay out what we followed as well as any of the changes that were made along the way.
The Line-up (Ingredients)
BAO BUNS
3 ¾ cups (450g) plain (all purpose) flour
2 tbsp caster sugar
½ tsp salt
2 tsp (equivalent to one packet or 7g) instant dried yeast
3 tbsp whole milk
3/4 cup + 2 tbsp (210ml altogether) warm water
3 tbsp unsalted butter, very soft
1 tbsp olive oil
CHICKEN AND MARINADE
4 chicken breasts sliced into bite-size chunks
1 cup (240ml) buttermilk
½ tsp salt
¼ tsp white pepper
¼ tsp garlic salt
CRISPY COATING
1 ½ cups (180g) plain (all-purpose) flour
1 tsp salt
1 tsp ground black pepper
½ tsp garlic salt
½ tsp celery salt
1 tsp dried thyme
1 tsp paprika
1 tsp baking powder
1 tsp chili flakes
vegetable oil for deep frying – at least 1 litre/four cups
KOREAN SAUCE
2 tbsp gochuajang paste
2 tbsp honey
4 tbsp brown sugar
4 tbsp soy sauce
2 cloves garlic peeled and minced
2 tsp minced ginger
1 tbsp vegetable oil
1 tbsp sesame oil
Game Plan (Instructions)
Start by making the bao buns.
Place the flour, sugar, salt and yeast in a bowl and mix together.
Add the milk, warm water (activates the yeast) and butter to a jug and stir together until the butter melts. Stir the liquid mixture into the flour mixture at first with a spoon, and then with your hands. Turn out onto a floured surface and knead for 10 minutes. Alternatively, you can do this in a mixer fitted with a dough hook.
(Me – hard at work)
Place the dough in an oiled bowl. Cover (with clingfilm or a damp tea towel and leave until doubled in size – about 90 minutes – 2 hours).
(My wife enjoys her spices from Penzeys – that’s where the towel came from too)
Meanwhile, start on the Korean Chicken. Place the chicken in a bowl. Add the buttermilk, salt, pepper and garlic salt. Mix together, cover and place in the fridge to marinade for at least 1 hour.
After the dough has proved (been aroused), tip it out of the bowl onto a floured surface. Knead the dough again and split into 20 balls. Place a piece of baking parchment on your work surface and roll each ball into an oval on top of the parchment, using a rolling pin – approx. 6cm x 9cm.
Brush the ovals with the olive oil and fold each oval over, using a chopstick in the middle to fold over to leave a little space in the fold (so the oil is on the inside of the fold). Remove the chopstick and place each bun onto a small piece of baking parchment.
(Some were done better than others)
Place the buns on the trays – still on the the baking parchment – as this will help you to move them later. Cover each tray with clingfilm or a carrier bag (ensuring the clingfilm doesn’t touch the dough – or it will stick) and leave to prove for a further hour, until puffed up.
(So much waiting!)
Preheat the oven to a low heat (to keep cooked chicken warm). Heat a large pan of vegetable oil (or preheat your deep fat fryer) until hot (you can test by dropping a small cube of bread in there, if it rises immediately to the top and starts to bubble rapidly, it’s hot enough). You’ll need at least 1 litre (4 cups) of oil.
Mix together the crispy coating ingredients in a small bowl. Take the chicken out of the fridge. Lift a piece from the buttermilk and allow the excess to drip off. Dredge the chicken in the crispy coating mixture – ensuring it’s fully covered. Place on a tray and repeat until all of the chicken is coated.
Once the oil is hot enough, add in 10-12 of the chicken pieces. You can add more or less depending on the size of your pan, just be sure not to overcrowd the chicken. Cook for 3-5 minutes until golden brown and cooked in the middle. You can check this by cutting open a piece of chicken, if it’s no longer pink in the middle, it’s cooked.
Place on a tray in the oven to keep warm whilst you cook the rest of the chicken.
Meanwhile, put a large steamer pan on to boil. Working in batches, place the buns in the steamer (you can keep them on the baking parchment and steam for 10 minutes. I use a double layer steam pan – placing four buns in each layer. Once steamed, place on a warm plate.
(Didn’t have a double steamer pan, so we did this)
While the chicken and bao buns are cooking, make the sauce. Place the gochujang, honey, sugar, soy sauce, garlic, ginger, vegetable oil and sesame oil in a saucepan and stir together.
Bring to the boil, then simmer for 5 minutes until thickened.
Place all of the cooked chicken in a bowl and pour the sauce over the chicken. Toss together to coat. You can leave the chicken chunks whole, or slice up if you prefer.
(The wait is almost over!)
Carefully open the steamed bao buns and stuff with the Korean chicken. Top with slices of red onion, cucumber, fresh coriander (cilantro) and sesame seeds before serving.
(This is the pretty shot)
(Yikes – that’s me. But, man, am I enjoying it!)
This meal was definitely a winner and we were both so proud of ourselves for having done it. Basically, it was one of those meals where you can’t believe what you are enjoying in your own house AND then to top matters off – you made it! Time was an issue though. It took all afternoon. However, as long as you have good company to share . . . you should just go ahead with making this meal sometime. Enjoy!!
For this meal, we were discussing what to go with when I had a distant happy memory of pickles on pizza. Now, it certainly wasn’t an original idea or anything. Again, it was memory, since I had actually seen one of my former clients, Bill McCarty, on television explaining this delicious thought of Philly Dilly Pickle Pizza. Click here for that.
If you want to go and try it out for yourself, just go hit up the restaurant – Barra Rossa in Philadelphia, PA. Otherwise, my wife and I dug around on the web and found this recipe to play out for my meal challenge. Just like with all the recipes done, simply click on the above title for the link of what was borrowed (adapted?). As always, I’ll lay out what we followed as well as any of the changes that were made along the way.
Meal prep music was provided by Spotify with Vampire Weekend – yeah, a repeat offender. We really like them.
And, of course, there was beverage to warm things up.
(See them pickle chips peeking out from behind)
The Line-up (Ingredients)
1 (14- to 16-ounce) ball pizza dough 2/3 to 3/4 cup ranch dressing 2 small garlic cloves very thinly sliced 1 cup freshly shredded low-moisture mozzarella (about 4 ounces) 1 cup very thinly sliced dill pickles dried dill for finishing hot sauce for finishing (optional, but duh! – We added it!)
Game Plan (Instructions)
1) Preheat the oven to 500°F (if using a baking sheet) or as high as it will go (if using a baking stone/steel; place the stone/steel in the oven before you start preheating).
2) Stretch or roll out your dough to a 12-inch circle, then transfer it to an oiled baking sheet or a lightly floured pizza peel (if using a baking stone/steel).
3) Spread the ranch dressing evenly over the dough, leaving a 1/2-inch border around the edges. Scatter on the sliced garlic and mozzarella, then arrange the pickles on top in an even layer.
(So many pickles!)
4) Transfer the pizza to the oven and bake until the crust is golden and the cheese has browned in spots—8 to 10 minutes on the baking sheet, 6 to 8 minutes on the baking stone/steel.
(Post hot sauce)(My wife took a pix with her beverage of choice)(My turn with camera, uh phone – my beer saying “hi” in the back there)(Close up aka delicious shot)
We were definitely happy with the outcome of this meal. I was also fortunate enough to have a couple slices for the road the following day – it’s good cold, too! If we were to make it again, I’m not sure if there would be any real future changes to make. There could certainly be some other options: different pickles, try with pizza sauce, or even mix in some banana hot peppers. Bottom line though, pickles and pizza together are a win!
Just days away from the first day of Autumn and there was already a slight chill in the air – therefore, soup was the chosen dinner for the night. We went with a favorite soup from the Olive Garden – Sopa Toscana. I was excited about the sausage. Meanwhile, my wife stated aloud, “The kids are gonna hate this.” In turn, we did have “Chicken & Stars” as back-up.
For my wife, Eva Cassidy’s album – Songbird – always reminds her of Fall, so that was playing via Spotify. Once the album was done, Spotify then picks similar music to continue your “theme”. Jamie Cullum was next, which shocked us both because in the beginning of our relationship, this album was a favorite of ours and had long been forgotten. The musical play was spot on for us, but back to the dinner prep.
As I always explain with all of the challenges, simply click on the recipe title for the link of what was borrowed (adapted?). I then lay out what we followed as well as the changes that were made along the way. I have to admit, my wife was kicking it into high gear for this one. By the time I would find a teaspoon or tablespoon, my wife had already eyed up the ingredient and added it to the pot. I did help though – I promise!
The Line-up (Ingredients)
2 tbsp of olive oil 1/4 stick (2 tbsp) of salted butter 3 large shallots, diced 2 lbs of Italian Sausage (sweet, hot or mixed), casing removed 1 tbsp of crushed garlic (we minced) 1 cup of sherry wine or a dry white wine (like a Sauvignon Blanc) 5 cups of garlic or chicken broth 1 tsp of Italian seasoning 1 tsp of oregano 1 tsp of garlic powder 1 tsp of seasoned salt 1 tsp of black pepper 1.5 lbs of baby red (or white) potatoes, sliced into quarters with the skin still on – we used white potatoes and a skill shot is shown below 5-8 oz of baby spinach 5.2 oz of Boursin (any flavor and can be found in the deli/fancy cheese section of most markets and Costco) or 5 oz of a brick of cream cheese 1 cup of heavy cream or half & half Crusty Italian or French bread, to dip in the soup
(See – I cut all of these – beautiful work, right?)
Game Plan (Instructions)
1. Add the olive oil and butter to the Instant Pot or Ninja Foodi. Hit “Sauté” and adjust so it’s on the “More” or “High” setting (hit “Start” after if using the Ninja Foodi). Once the butter’s melted, add in the shallots and sauté for 3-5 minutes until lightly browned
2. Next, add the sausage and break it down with a wooden spatula/mixing spoon until crumbled (like a ground beef) and sauté (stir & set) for another 35 minutes. Add the garlic about 1 minute after the sausage is cooking and stir it in
3. Pour in the sherry and let simmer for 3 minutes and follow with the broth, Italian seasoning, oregano, garlic powder, seasoned salt and black pepper. Stir well
4. Lastly, add in the potatoes, top with spinach and DO NOT STIR (leave the spinach right on top as it will cook down into nothing). Secure the pressure cooking lid, hit “Keep Warm/Cancel” or “Stop” and hit “Pressure Cook” or “Manual” high pressure for 10 minutes (it will take a solid 10 minutes or so to come to pressure due to the amount of volume in the pot). Quick release when done.
(over five minutes of pressure release!)
5. Stir in the Boursin (or cream cheese) until melded and then add the heavy cream or half & half
6. Ladle into bowls and serve with some crusty Italian or French bread
(I forgot about doing the “pretty shot”, but here’s before & after of my enjoyment)
After the first taste, there was too much of a fennel flavor to the soup. In order to cut that taste slightly, we added some hot sausage. Did I think of this? Absolutely not, but I witnessed the difference it made and slowly my cooking skills expanded. The soup was good. We had leftovers and my wife & I enjoyed them during lunches at work. Will we make it again – no urgency there, but we again did like it.
Setting the mood for this meal, we went to one of our favorites on Spotify with their playlist for Vampire Weekend. One year ago, we saw this incredible band in New York City’s Madison Square Garden. We along with another fun couple (who knows – maybe they were the only fun couple of our group, but they appeared to enjoy our company) went on to have a most memorable weekend with various beer beverage pit stops from nearby small breweries. The overwhelming favorite was Other Half Brewing in Brooklyn – oh, the IPAs were magically delicious! Initially, we all thought that we would be revisiting this trip again this year – ho hum, thanks 2020.
Anyway – back to the meal prep! The veggies weren’t the only items grilled up for our dinner. We did throw on some chicken – nothing fancy there, so we didn’t highlight the bird breakdown within this Meal Challenge post. As for the actual “Grilled Vegetables with Fresh Basil Pesto” recipes, simply click on the recipe title for the links of what was borrowed (adapted?). As always, I’ll lay out what we followed as well as the changes that were made along the way.
The Line-up (Ingredients)
GRILLED VEGETABLES 1 Red Onion 1 Red Pepper 1 Green Zucchini 1 Yellow Squash Avocado Oil Sea Salt and Black Pepper 4 ounces goat cheese 1/3 cup pesto . . . buy in the store or make your own as we did!
(Basil – from our very own deck garden!)
FRESH BASIL PESTO 1 cup fresh basil leaves, packed 3 Tbsp. toasted pine nuts 1/4 cup freshly grated Parmesan cheese 1 garlic clove 3 tsp. fresh lemon juice 1/4 cup + 2 Tbsp. extra-virgin olive oil Kosher salt and black pepper, to taste
Game Plan (Instructions)
GRILLED VEGETABLES 1) Prepare the vegetables by quartering the zucchini and red pepper lengthwise and slicing the eggplant and onion into 3/4″ rounds. 2) Brush all the vegetables with avocado oil (or cooking oil of your choice) then season with sea salt and pepper. 3) Heat up your BBQ then turn the temperature down to low. 4) Place the vegetable pieces straight onto the grill and cook for 7-8 minutes or until the vegetables have become tender and have started to char flipping the pieces about halfway through the cook time.
(I got excited and posted this on social media)
5) When the veggies have cooked, arrange them onto a serving plate then drizzle with pesto and top with crumbled goat cheese.
(Later shot showing more meat)
FINE BASIL PESTO 1) Combine basil leaves, pine nuts, Parmesan cheese, garlic, and lemon juice in a bowl of a food processor. Pulse until finely minced. Scrape down the sides with a spoon or small rubber spatula. 2) While the food processor is running, slowly add the olive oil in a steady small stream. Scrape down the sides as needed. Season with salt and pepper to taste. Use immediately or refrigerate for up to 1 week
(Final product via my wife!)(my final shot showing off the white wine beverage)
This was a delicious summertime meal and fittingly right off of the grill. Most definitely a meal that we could revisit again. Plus, the process would have been even faster for us if we didn’t create our own pesto, but that was still fun. Nevertheless – we’ll be doing this meal in the nearby future.
For this Thursday meal, my wife and I had actually laid out the whole week on the prior Sunday. The plan was for this day to be a Meal Challenge. However, it was a hot Thursday in the summertime and I just had a long workday on the road throughout NJ. There were zero desires from me on moving . . . let alone helping out. However, thanks to my wife, she rallied me along. Honestly, I wanted to be a part of it, but I just needed that push and I’m so glad that I did because it was a wonderful dinner with of one of my favorite meals – tacos! As I always explain with all of the challenges, simply click on the recipe title for the link of what was borrowed (adapted?). As always, I’ll lay out what we followed as well as the changes that were made along the way.
We actually performed this meal prep in silence and simply enjoyed one another’s company. HA! Who am I kidding – our two children were running around while providing the “music” of fun to fill the silent void in our evening. I think we did eventually turn on the local radio station to spread out the nonsensical sounds.
Beverage! Yeah – we had some and it was used in the dish as well!
(Via my 2019 stash! 2020 session came out following week!)
The Line-up (Ingredients)
2 pounds boneless skinless chicken breast or thighs 2 teaspoons smoked paprika 2 teaspoons chipotle chili powder 1 teaspoon garlic powder 1/2 teaspoon cinnamon kosher salt and black pepper 2 cups of your favorite BBQ sauce 1/2 cup of your favorite beer, or use chicken broth (I used Pumpkin beer) 3 cups shredded cabbage 2 cups grilled or steamed corn 1/2 cup fresh cilantro roughly, chopped 2 tablespoons chopped fresh chives warmed corn or flour tortillas and shredded sharp cheddar cheese, for serving
Game Plan (Instructions)
INSTANT POT
1. In the bowl of your instant pot, combine the chicken, chili powder, garlic powder, paprika, cinnamon, 1 1/2 cups BBQ sauce, the beer, and a pinch each of salt and pepper. Cover and cook on high pressure/manual for 8 minutes. Once done cooking, use the natural or quick release function and release the steam.
2. Switch the instant pot to sauté and cook 5 minutes, until the sauce thickens. Shred with two forks. Add remaining BBQ sauce, if desired.
3. Meanwhile, make the ranch. Combine all ingredients in a blender and blend until smooth and creamy, adding additional buttermilk, 1 tablespoon at a time, as needed to thin the sauce. (FYI – we actually had leftover ranch from Meal Challenge #6, so we utilized that)
4. To make the slaw, add the cabbage to a bowl with a few spoonfuls of the ranch and toss to combine. Add the corn, cilantro and chives, and season with salt.
5. Stuff the cheese and chicken into the warmed tortillas. Top with slaw and add the ranch. As you’ll see in the final shot, we also topped with pickled onions that we made in Meal Challenge #6 – that meal ruled with all the “extras” that it delivered.
(I appropriately finished off the pumpkin beverage and then rolled right into an exquisite IPA from Vermont)(Final shot – mmmmmmm!)